

I've been collecting ideas about how to use craft foam and thought I'd share them here. When I speak of craft foam, I'm talking about a whole class of products, including, but not limited to, the sheets of craft foam you can buy at Walmart and Michael's. Yesterday I went to the dollar store looking for kneeling pads for gardening. Of course, I didn't find any (it's a dollar store rule that you don't actually find what you're looking for) but I did find some thick foam door knob hangers and some of those foam puzzle pieces they use on the floors in pre-schools...
I've also nabbed the foamies that my kids used to play with in the tub (when wet, they cling to the tile wall, but my kids mainly just used them to gnaw on..) Amazingly enough, there are loads of ways to use these things to paint and stamp!
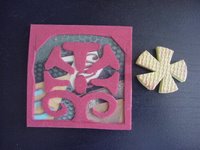
1) Reusable texture stamps. If you hold these over a light bulb or heat (carefully!) with a hair dryer/heat gun, then press quickly into something with shape or texture, these will pick up the texture--I've copied carved pieces of wood, carpet texture, wood grain--you name it. They won't pick up fine detail, but they're wonderful to use with paint or pigment ink and you can reheat them and use them over and over! I've even made intaglio images of bold rubber stamps using this technique. One of the rubber stamping companies (maybe Colorbox?) sold these several years ago in the form of thick foam blocks--I believe they were called penscore, as you can also draw on them, though that would be permanent--expensive, and easily replaced by the cheap bath toys...
2) Mounting for unmounted rubber. I got this idea from Michelle Ward's web site. She attached large, trimmed rubber alphabet stamps to garden kneeling pads using contact cement--washable, durable, padded, and cheap!
3) Make your own stamps by cutting foam sheets. I wanted a very big, kind of antique-y alphabet last year, and made my own. I typed the font and size I wanted using Microsoft Word, then traced the letters onto foam sheets, and cut them out. Perfect for using with messy paint! I temporarily mounted the letters/words I wanted using double stick tape since I try to save storage space, but these could be permanently mounted on thicker foam using contact cement. I've also made design stamps this way as a cheaper alternative to handcarving my own stamps.
4) Make your own stamps by burning the foam using a woodburning tool. This came from Traci Bautista's new book and works great. The fumes are a little strong, so I'd open a window or turn on a fan or work outside, but what a fun, easy way to make a stamp!
No comments:
Post a Comment